Why is this happening?
A flickering iPad screen can be caused by a variety of factors. Either software or hardware problems may be to blame. Most commonly, it is caused by a software error, such as a buggy iOS update or outdated apps. There is also the possibility of a screen glitch.
How to solve the iPad Screen Flickering Problem?
Below are some of the most reliable and best solutions to your problem based on the possible reasons mentioned in the previous section 1. 1. Force Quit Apps

Whenever your iPad’s screen flickers while launching an application, observe whether this happens with only one or two apps, or with all apps. If the problem is localized to a specific app, it is very likely that the issue is with the app and not with your iPad. Therefore, force quitting this app is advised.
Follow these steps to force quit an app: Open the App Switcher by double-clicking the home button. Find the app and swipe it away. Launch this app again to see if the screen still flickers after the operation. Then, try reinstalling the app. If your iPad lacks a home button, swipe up from the bottom of the screen to access the app switcher.
2. Force Restart your iPad

Restarting your iPad is a common method of solving many problems with a high probability of receiving a positive response. As a result of this process, all apps are forced to stop working, so force restarting can resolve software glitches. Follow these steps for those iPads without the Home button: on force restart your iPad:
- iPads with the Home button :
Hold the Home and Top buttons together for a few seconds until the Apple logo appears, then let go of the buttons.
- Those iPads without the Home button:
Step 1: Press and release the volume up
Step 2: Press and hold the Volume down
Now long-press the right side button on the screen until you see the Apple logo appear.
3. Turn the iPad and press its Back
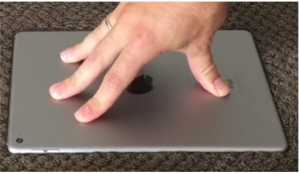
You might find that certain hardware components are not in their proper place, so follow these steps to fix this.
Switch off your iPad after removing any hard cases from the screen. Place a soft thick cloth on a suitable surface for placing the screen on. With one hand, hold down the iPad and use the other hand to knock on the back of the tablet multiple times. Keep doing this for some time, then put the iPad on.
4. Disable the Auto-Brightness Feature
There are several reasons for screen glitching, including out-of-place device settings, including auto-brightness. Follow the steps to turn off auto-brightness on your iPad.
Go to Settings> General> Accessibility> Display Accommodations> and turn off the Auto Brightness option.
5. Enable Reduce Motion and Transparency
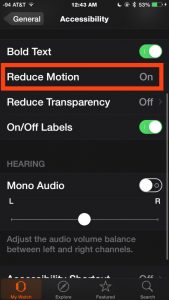
Reduce motion settings are also out-of-place. To enable them, follow the steps below.
For Reduce Transparency, go to Settings> General> Accessibility> Increase Contrast> Toggle the Reduce Transparency switch. Now return to the Accessibility settings screen and toggle the slider in front of Reduce Motion to enable it.
6. Keep your iPad Updated
By replacing your iPad’s OS with a new version, you can resolve screen flickering issues. Follow these steps to update your iPad:
Choose Settings> General> Software Update> Download and Install> Then click on Install Now
If you wish, you can also enable Automatic Updates.
7. Check iPad Storage
Sometimes, screen flickering issues are caused by storage performance issues. In such cases, you are recommended to optimize your storage. To do this, follow the steps listed below.
Go to Settings > General > iPad Storage
You can check the storage consumption of each application on your device here. The recommendations for optimizing your storage will also be prominent.
Below are some other tips for resolving iPad screen flickering –
- Use tools like WooTechy iPhixer, Joyoshare UltFix, etc., to fix iPad screen flickering.
- Repairing the iPad screen
- Reset iPad factory settings/Hard Reset iPad
Summary
I hope you found this article helpful. The above solutions are particularly effective for solving iPad screen flickering caused by software-related issues. If you still have trouble or if you have a hardware problem, you can visit an Apple store.
]]>
We live in a world full of gadgets and smart devices and with such a budding technology and digital world, Smartphone Accessories has become a necessity for us to be cognizant of all.
With the spiraling use of smartphones, there is a rise in the need for smartphone accessories which can certainly make our lives easier and more comfortable. So let\’s get started with some amazing smartphone accessories that can save you a ton of time and efficiency –
1. inCharge 6- a Multi-connecting Charging Cable

It is one of the coolest smartphone accessories designed by a popular Swiss manufacturer – Rolling Square, which develops many related products. This latest product is a 6 in 1 connecting cable that lets you connect between different types of USB.
To be more precise, inCharge 6 supports USB, Type C, Lightning, and Micro USB connections. It is lightweight, portable, small and easy to use.
Another feature is its magnetic power which allows both ends to stick together, making it more convenient and durable. Some other products designed by Rolling Square include inCharge mini, inCharge X, TAU, etc.
2. Adonit Snap 2 Stylus

Adonit Snap 2 is an ultimate combination of a fine point stylus with a Bluetooth camera shutter remote to reinvigorate the creativity of users. It allows you to draw, doodle, and write on your smartphone with precision and completely revamp your storytelling skills on social media giants like Instagram and Snapchat.
It is specially made for iPhone users, however it can work on any smartphone. The shutter remote makes it most convenient to control your iPhone’s camera.
On top of everything, this compact and lightweight device is accompanied by magnetic attachments and an LED battery indicator.
3. Pivo Pod – This Smartphone Accessories Mount Tracks You Automatically
 Now this smartphone accessory can make you awestruck. It turns your smartphone into a cameraman and provides you with a fully automatic videographer.
Pivo pods can do a lot of things like automated time-lapse, panorama, object tracking, etc. Its functions can either be controlled via remote or through a phone app via Bluetooth.
The motorized action has a smooth motion and offers 360-degree rotation. It is tripod friendly and has an auto-tracking feature along with living streaming/ video calling.
4. Razer Kishi Gaming Controller

It is a cool tech accessory with such a convertible design that makes it easy to carry. It does not involve any batteries, with 11 buttons and 2 directional pads.
Furthermore, it can charge while you play as it has a USB-C port and best of all it is quite affordable with a range of below $100!
5. Moft X- Foldable Smartphone Accessories Stand

Moft X offers you a super comfortable, thin, lightweight, and aesthetically designed portable cell phone stand.
It is certain to provide you with immense comfort while working on your device and fully enjoy the content in both portrait and landscape mode.
What’s more? It also contains 3 cardholders and a magnetic sticky stand.
6. Gaze pad Pro – Wireless Charging Mouse Pad

Gaze pad Pro is a smartly designed wireless charging mouse pad. The designers have intelligently and considerately designed the product to obviate the hasty charging problems of the end-users.
It has a non-slip base and two Type-C charging ports. The 3 coil system largely enhances the charging area.
For convenience in placement, the product is also provided with a dual charging port. To add on, its sleek but elegant design comes with a range of colors to suit your style.
7. Prima 1080P Pocket Projector

Projectors are often linked with heavy, bulky, and unportable, but what if I tell you the Prima 1080P is a pocket projector.
This portable, slim build, and lightweight projector offer you a screen projection of up to 200 inches, that too, in HD. To add on, it comes with Bluetooth and also supports screen sharing.
It enhances every moment into a priceless experience. Created with DLP Technology, it has a 3hors battery life. Enjoy it anywhere, be it your school, office presentation, or your most cherished Sunday movie nights.
8. PowerUp 4.0 Smartphone Accessories Controlled Paper Airplane (RC)

Have you ever wondered what it would be like to be able to put a motor and an onboard circuit on a paper airplane and turn it into an RC Airplane? How amazing, right? Well, don’t just wonder because now I present to you this amazing smartphone-controlled device that attaches to any paper plane and allows you to fly it from anywhere.
POWERUP 4.0 has an onboard computer/circuit that can function on autopilot. The device comes with a wind stabilizer allowing you to fly in windy conditions as well as a launch assist meaning that even if you throw a bad launch for your flight, the onboard computer will stabilize the plane and pull it up safely into a good flight. Additionally, it has a gyro accelerometer, flight telemetry, and some cool night lights.
9. Ampulla MiniS Bluetooth Speakers

These highly portable Bluetooth speakers are one of their kind that comes with a built-in microphone and good battery life. For cycling lovers it has bike mounts, for runners it has armbands.
Not just that, if you are a cooking lover you can stick them on the fridge because they are magnetic! Relish your favorite songs anywhere, anytime.
10. Omni 20 Powerbank – Power Anything You Want

This is your all-in-one power bank that can charge multiple devices at the same time. It has AC/DC/USB-C/Wireless Charging Options. Additionally, it has a 230V AC power inlet, so it is not only limited to smartphones and tablets but also laptops. Another important feature is its fast charging capability.
]]>
If you notice iPhone 13 battery drain problem, know that the problem of battery drain on your iPhone can occur for several reasons. You may be running several applications at the same time, or apps that are not compatible with iOS can cause drainage even though the app itself isn\’t draining the battery. Battery drains can be frustrating, especially when it’s a newly bought iPhone. Therefore we present you quick and effective way to solve your battery drain problem.
How to fix iPhone 13 battery drain in iPhone 13, 13 Mini, 13 Pro, 13 Pro Max?
If your iPhone 13, iPhone 13 mini, iPhone 13 Pro, or iPhone 13 Pro max battery life starts draining fast, then there are some steps you should consider before getting in touch with Apple customer support. Follow these steps in the same sequence and check if the issue has been resolved after each step in your iPhone 13 series.

1. Restart the device
One of the simplest and most productive methods to fix battery drain, slow charging, or any other battery-related issues on your iPhone is to reboot the device. Follow these steps –
- Press the Volume Up/Volume Down button and the Side button simultaneously.
- Swipe the slider left to right. This will turn your iPhone off.
- Wait for about a minute and then hold the Side button until you see the Apple logo. Your iPhone will restart.
2. Update iOS
If you’re facing battery drain issues on your iOS 15, check to make sure you’re running the latest stable version. Some initial versions of it can have some bugs, but Apple releases many software updates that help with important bug fixes, security patches, and performance enhancements.
To make sure you have the latest version, follow these steps –
- Go to Settings > General
- Click on ‘Software Update’.
- If any updates are available, download them.
3. Check you Charger
Do make sure that the charger you’re using is either official or MFi (made for iPhone, iPad, and iPod) certified. Using non-MFi certified accessories can cause battery drain, no or slow charging, and many other battery-related problems on your device, not to mention the several long-term issues.
Go through the following tips to make sure you’re using the right charger –
- Use the official charger (both, adapter and cable) that came with your phone or the one that you bought from the Apple Store or some reliable third-party resellers.
- Do make sure to check your charging cable for visible signs of damage, like exposed wires. Bends, or breakage. If your cable is damaged, use a new one.
- It’s important to make sure that the cable is not damaged internally. If your family member has got an iPhone and their charger is working perfectly fine, try to re-energize your phone with that charger. If you’re able to do so, it’s evident that something was wrong with the previous charger. Hence, the solution would be to replace the faulty charger.
4. Use Low Power Mode
Using low power mode will disable or limit some features like background app refresh, auto-lock, email fetch, automatic iCloud uploads, some visual effects, etc. Due to this, some features may take longer to update or complete, but it’s done to reduce power consumption on your iPhone, which can give 2-3 extra hours of battery life.
Follow these steps to enable low power mode on your device –
- Head to the Control Center and click the battery icon. It should turn yellow.
- You can also go to Settings > Battery and turn the slider ON for Low Power Mode. Again, this will make the battery icon turn yellow.
I should inform you, though, that for the low power mode to work, the battery should be below 80%.
5. Lower the Brightness
Brightness is one of the main reasons for battery drain. Many users don’t realize that a brighter display not only consumes more power, but can also result in overheating of the device.
That having been said, I should also inform you that the ideal screen brightness is around 40-60 percent in ambient lighting. Follow these steps to adjust the brightness on your iPhone –
- Go to the Control Center and adjust the slider for the screen brightness.
- Alternatively, you can head to Settings > Display & Brightness and drag the slider to adjust the brightness.
Turning off auto-brightness is also a good idea. To do so, go to Settings > Display & Brightness and then turn the slider OFF for Automatic.
6. Avoid usage of Widgets and/or Dynamic Wallpaper
If you’re facing battery drainage issues on your iPhone 14, it might be because you’re using Dynamic or Live wallpapers. Try disabling them and switch to the regular wallpapers. The reason is dynamic wallpapers move continuously, and live wallpapers show animation which results in the consumption of more battery.
To disable dynamic or live wallpapers, head to Settings > Wallpaper and pick a new wallpaper. You can either choose an option from Stills or an image from your Photo Library.
Now moving to widgets. They are undoubtedly a great addition and make things much more interesting, but going overboard with them can cause faster battery drain issues, especially if they use location services. So, to avoid complications, you must check and remove unnecessary widgets.
7. Using Dark Mode
All the models of the iPhone 13 Series have the Super Retina XDR OLED display, so using the Dark Mode can help improve the overall battery life. Because, unlike LCD, OLED displays light up every individual pixel to create an image. Also, OLED screen displaying bright colors uses up more power as compared to the darker ones. Therefore, using the Dark Mode can add to the battery life.
You can follow these steps to turn on the Dark Mode –
- Open the ‘Control Center’, press and hold the ‘brightness control’, and click on ‘Dark Mode’.
- Move to Settings > Display & Brightness and click on ‘Dark’.
You also have the available option to set Dark Mode on your iPhone automatically from Sunset to Sunrise or schedule it as per your preferences.
8. Turn off ‘Raise to Wake’.
The Raise to Wake option turns on your iPhone’s display automatically every time you pick up your phone, and it’s facing you, which results in drain of battery.
To turn off the Raise to Wake option, go to Settings > Display & Brightness > Raise to Wake > Toggle Off.
Another little tip would be to turn the Auto Lock to 30 seconds instead of more time periods, since letting the iPhone remain on for unnecessary amounts of time can consume more battery.
9. Disable Background App Refresh
One of the reasons for battery drain can be the ‘Background App Refresh’ option. To save your battery from draining, you must disable it, and to do so, head to Settings > General > Background App Refresh, and select OFF.
There can be situations where you need to enable this mode for some apps, so tuning it to ‘upload only in Wi-Fi’ option will be a good idea for them.
10. Disable 5G or Use Wi-Fi
Keeping 5G on all the time can be another culprit responsible for your problem. Users have noticed that the battery drains faster on 5G networks as compared to LTE. To turn it off, go to Settings > Cellular > Cellular Data options > Voice and Data and select LTE.
Another good idea would be to disable the Wi-Fi by going to Settings > Wi-Fi > Turning OFF the slider for Wi-Fi. This will work because if you’ve turned ON Wi-Fi and there’s no Wi-Fi network available, your iPhone will keep searching for a network, and this will consume power unnecessarily.
11. Turn off Unnecessary features
Mobile Data and Location services are known to be amongst the major battery killers on any smartphone, so using Wi-Fi instead of mobile data or turning mobile data off whenever you don’t need it might be a good idea. There is no use keeping location services on when they’re not even in use, so go to Settings > Privacy > Location Services to turn it off.
12. Check your applications
Some apps can be problematic for your iPhone 13 and can not only drain too much battery, but cause other issues like overheating as well, so it is crucial to keep your apps in check by going to Settings > Battery and checking the battery consumption by each app.
You can also just uninstall all the apps you don’t need or use. Apps can use a lot of resources on your device, and keeping unnecessary applications might be doing more damage than you think.
13. Reset All Settings
- Tap on Settings > General and scroll to the bottom
- Click on ‘Reset’ and then ‘Reset all settings’
- You will be asked to enter your iPhone’s passcode and then ‘Confirm’ to reset all your settings on your iPhone.
Following these steps will restore your iPhone to default settings. Fortunately, this hack won’t delete any data from your iPhone
14. Factory Reset your iPhone
If you have done all of what was mentioned above and are still not getting the results you want, then Factory Reset might be for you, but it is important to note that this will erase everything from your device.
- Go to Settings > General and click on ‘Reset’ which is available at the bottom of your screen.
- Now, tap ‘Erase All Content and Settings’.
- You’ll see a pop-up appear asking if you want to back up the data or erase it right away.
- Confirm your decision. It will make the Erase iPhone option available on the screen.
- After confirmation, the process should be complete in a few minutes
Hope these tips prove useful for you, and if non of the above works for you then you can always visit the Apple community thread or call on customer service if required for your iPhone 13 battery drain issue.
Hope this article proved to be useful for you and assisted you to solve your iPhone13 pro max battery draining feel free to connect with one of our service assistant to solve your problem. Connect Now
]]>
How to fix iPhone 13 Apps Crashing Issue?
Do you hate it when your iPhone 13 apps crashing issue occurs? We get it, it can make your phone almost useless. Apps don’t just crash, there can be various reasons responsible for the crashing of apps on your iPhone 13. This guide will show you how to fix issues with iPhone 13 apps so they don\’t crash and you aren\’t forced to delete them.
Here are some solutions to help you fix iPhone 13 apps crashing issue :-

1. Restart Your Device:-
Rebooting your device is one of the fastest, simplest, and most effective ways to solve most of the issues. So the first thing to do when your apps crash is to restart your iPhone 13. Restarting your device frees up the memory of code and fills it back afresh, resolving any corruption or any other problems.
Follow these steps to reboot your iPhone –
- Press and hold the Volume Up key and Side Button simultaneously until the slider appears.
- Drag the slider to turn the iPhone off.
- After a few moments, turn the iPhone back on using the Side Button.
2. Close other Applications:-
Sometimes the solution to stop apps from crashing is to close other apps, as it frees up memory. This is how you should proceed –
- Swipe upwards from the home bar and hold the swipe somewhat in the middle. The apps that are open will be listed.
- Now you can simply flick the apps upwards to close them and free memory.
3. Clear Browsing Tabs:-
If your browser has too many tabs open, it might result in consumption of extra unnecessary memory and may cause apps to crash. Clearing out these tabs can help these apps run efficiently. Here’s how you clear the tabs –
- Launch Safari and tap the Tabs button in the bottom right corner.
- Now, either tap the ‘X’ on each thumbnail image or flick the thumbnails you do not want to the left to close them.
4. Reinstall the app:-
This is a solution for when only one or two apps are causing problems, not all of them. You can fix the issue by deleting and reinstalling the particular app(s). Here’s how –
- Long-press the icon of the app you want to delete, and let go when the apps start shaking/jittering.
- Click on the (-) symbol on the icon, tap ‘Delete’ and then ‘Confirm’ to delete the app from the iPhone.
Now follow these steps to download the application again –
- Open the App Store and click on your profile picture in the top right corner.
- Tap on ‘Purchased’ and then ‘My Purchases’.
- Now search here for the app name and tap the symbol that depicts a cloud with a downward pointing arrow to download the app again.
5. Update the application:-
Once again, if only a couple of apps are crashing, not all of them, then the issue is with the application(s). Updating the app could help it function properly.
Follow these instructions to check for new updates –
- Launch the App Store and tap the profile picture in the top right corner.
- If there are any apps to be updated, they will be listed there.
You can also simply drag the screen down to refresh, and the App Store will check for updates afresh.
6. Offload Applications:-
Offloading the apps that are crashing to refresh app data can help resolve the crash. This solution will not delete your personal data from the app, it will only delete the app data such as caches, etc. Follow these steps –
- Open Settings, scroll down and tap ‘General’.
- Scroll down and click on ‘iPhone Storage’.
- From this list of apps, select the app that is crashing and click on ‘Offload App’.
- Now click on ‘Confirm’.
7. Check the iPhone Storage Space:-
One of the reasons for apps to crash can be the lack of storage. Follow these steps to check how much storage is being consumed on your device –
- Open Settings and scroll down to ‘General’.
- Then, scroll down and tap ‘iPhone Storage’.
- Here, the graph will populate and tell you how much storage is being used.
Lack of storage can crash apps when you try to use them since there is no space for them to launch and function, so you might want to clear some space for the app to be able to function to its full capacity.
8. Reset all Settings:-
Sometimes, resetting all settings on your iPhone is the solution to solving the issues that might be causing apps to keep crashing on your iPhone 13. Here is how to reset all settings on iPhone –
- Tap on Settings and scroll down to find ‘General’.
- Scroll down and click on ‘Transfer’ or ‘Reset iPhone’.
- Tap ‘Reset’ and then ‘Reset All Settings’ from the popup.
- Key in your passcode and your device settings will be reset successfully.
What to do if none of the above work for iPhone 13 Apps Crashing Issue ?
If none of the solutions listed above help you solve your problem, the next step is to restore the device firmware. To do that, you could either use iTunes or macOS Finder, or use a simple tool which is easy to use.
1. Use Wondershare Dr. Fone – System Repair (iOS):-
- Get Dr. Fone.
- Now connect your device to the computer and launch Dr. Fone.
- Next, tap on the ‘System Repair’ module.
- The Standard Mode does not delete your data while fixing iPhone app crashing issues, so selecting this would be preferable.
- Let Dr. Fone detect your device and iOS version on it, then verify its veracity and click on Start when all information is identified correctly.
- The firmware will get downloaded and verified, and you can tap on ‘Fix Now’ to start restoring the iOS firmware on the device.
Now your iPhone will restart, and you can reinstall your apps without worrying about them crashing.
2. Using iTunes or macOS Finder:-
If you do want to use the Apple way to restore the firmware on your iPhone instead of using Dr. Fone, here are the steps you need to take –
- First, connect your iPhone to your computer and launch iTunes (on older macOS versions) or Finder (on newer macOS versions).
- Let the app detect your iPhone and then click Restore in iTunes/ Finder.
You will need to disable ‘Find My’ to continue this process.
You can check for any available updates by clicking on “Check for Update”.
Likewise, you need to click on ‘Restore iPhone’ and agree to the license agreement to proceed with the process. This process will delete your data during the reinstallation of iOS. And you will have to reinstall every single app on your iPhone that existed before restoring. Hence, this can be time-consuming and is a hassle.
These few techniques can be very useful to avoid further issues in the working of the iPhone and can ensure the satisfactory functioning of your device. Connect now
Are you trying to figure out how to fix the black screen?
Well, then you’re in the right place! Black screens are often the cause of many problems, especially if you’re in the middle of something or if you’re using your iPhone for business purposes.
Here are 6 simple but effective ways to help you fix your iPhone 13 if the screen turns black and becomes unresponsive.

Why is your iPhone 13 displaying a black screen?
The first step is to find out the possible cause for your iPhone 13 showing a black screen, whether it is due to hardware issues or software issues. If it’s a hardware issue responsible for the black screen, you might want to get technical assistance from the Apple Service Centres to get rid of the problem, as it requires a thorough analysis of the iPhone parts to fix the hardware issues on iPhone 13 and those can be challenging to solve on your own.
However, if it is a software issue that is holding you back from using your iPhone 13, iPhone 13 Pro, or iPhone 13 max, then there are various ways to get rid of the black screen.
What to do if the iPhone 13 shows a black screen but still works?

Is your iPhone 13 showing a black screen, but you are still able to hear the notifications from text messages or other social media applications? Then there are two different methods with step-by-step instructions on how to solve the problem —
Force restart your device.
Black screens can sometimes appear as a result of minor software crashes in the iPhone. The force restart procedure can help get rid of the issue in no time.
Step 1: Press and quickly let go of the Volume up button.
Step 2: Now hold and release the Volume down button.
Step 3: Finally, long-press the side button on the right till the Apple logo gets displayed on the screen.
These instructions will help restart the system, hence overcoming the black screen issue on the iPhone 13.
Uninstall suspicious applications.
Sometimes your iPhone 13 screen suddenly turns black while using an application, this means that the problem is not the device, but the app itself. This can mostly happen due to the application being outdated, or unreliable and risky for your device. If this is the case, you should swiftly delete the app or update it using the respective websites. Follow these instructions to solve the problem —
Step 1: Exit the application
Step 2: Determine the suspicious app and long-press it.
Step 3: Then, click on the \”Delete App\” option from the pop-up list.
After trying out these two methods, if your iPhone 13/ iPhone 13 pro/ iPhone 13 max black screen issue or iPhone black and white iOS 13 problems are still not resolved, try following the instructions below to get the desired result.
What to do if iPhone 13 shows a black screen without any response?
If the ways given above do not work for you, or if your device is showing a black screen with no response from applications, then here are other methods for you —
Charge your device.
Your device can be stuck on a black screen because it ran out of battery, so using an active power source or connecting your iPhone to the authorized charger will help.
Step 1: Connect your device’s charging port to a charger or use a wireless charger. If it is the battery drain that is causing the black screen, your iPhone\’s screen will light up and present an empty battery icon.
Step 2: Wait for 15-20 minutes for your device to charge and then reboot it.
If the iPhone is still unresponsive, try repeating the process and checking that the charger is connected properly.
Install Dr. Fone – System Repair (iOS)
Employing this third-party app can fix a lot of problems without the loss of any data. It is safe and reliable and can resolve several issues within minutes, including —
- Device stuck in Recovery Mode or DFU mode.
- iPhone 13 black screen and white screen of death.
- An iPhone caught in a boot loop with continuous restarting issues.
- Other iOS issues and the freezing of the iPhone.
This app is a solution to many software issues concerning iPhone 13 and can help fix them without the user needing much technical knowledge. Follow these steps to repair your device using Dr. Fone —
Step 1: Download and launch the correct version of this tool on your PC. Then, connect your iPhone 13 using a reliable cable to the computer.
Step 2: Select the \”System Repair\” module available on the home screen of the app.
Step 3: Now, perform iOS repair by choosing it on the left pane and clicking on Standard Mode on the right side of the screen. The app will identify and process the connected iPhone 13 and iOS version automatically.
Step 4: Finally, install the firmware and fix the issue on your device.
Finder or iTunes
This method can cause loss of data, so it would be wise to back your data up if you are going through this process.
Step 1: Connect your device to iTunes or Finder.
Step 2: Press and then quickly release the Volume Up button and then the Volume Down buttons on your iPhone, followed by the long press of the side button until the Apple logo is displayed on the screen to put your iPhone in recovery mode.
iTunes or Finder will detect your iPhone 13. Tap on the \”Restore iPhone\” to proceed with the iPhone restore process.
DFU Restore.
This method too can result in loss of data, and it is a complex procedure, so you might find yourself a little confused in this process.
Step 1: Connect your iPhone to the computer and long-press the side button (about 3 seconds).
Step 2: Press the Volume down button and Side button together until the Apple logo appears on the screen.
Step 3: Open the iTunes or Finder on your computer, wait for the iPhone 13 to be detected and complete the restore process. After that, your device will restart automatically.
How to prevent this from happening again?
Having to fix your iPhone’s black screen over and over again can be inconvenient, so here are some ways to prevent a repeat of this experience in the future.

- Keep your applications updated to the latest versions and try not to install any unreliable apps.
- Using your device while charging can result in heating up of the iPhone. Avoiding the usage of the device is recommended.
- Charge your iPhone 13 before the battery gets lower than 20% and charge up to 99% for peak performance.
These few techniques can be very useful to avoid further issues in the working of the iPhone and can ensure the satisfactory functioning of your device. Connect now
]]>